
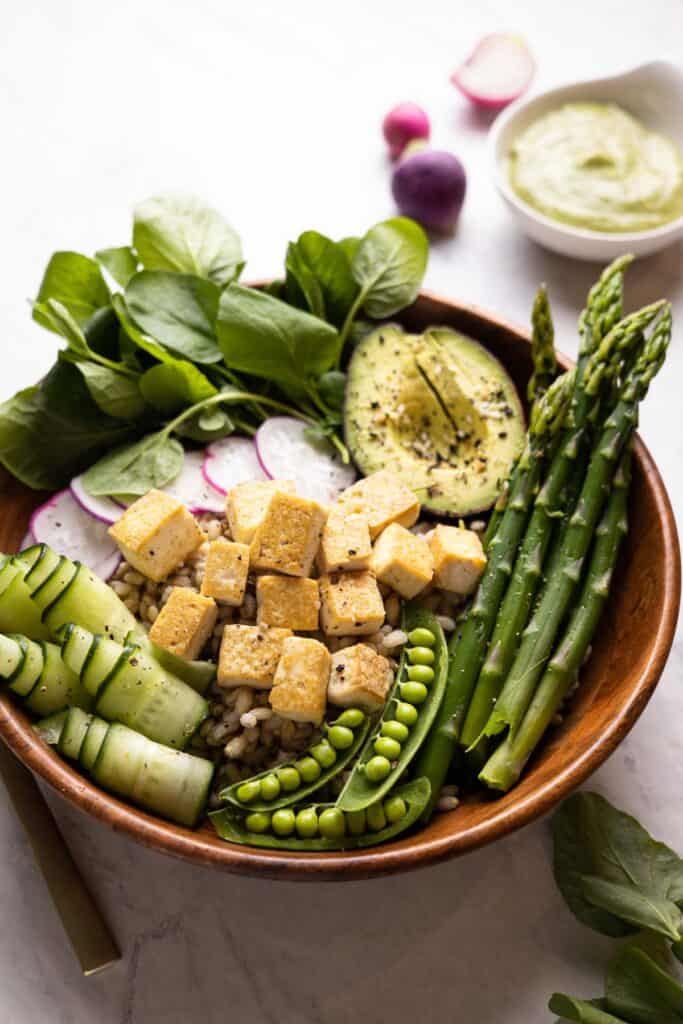
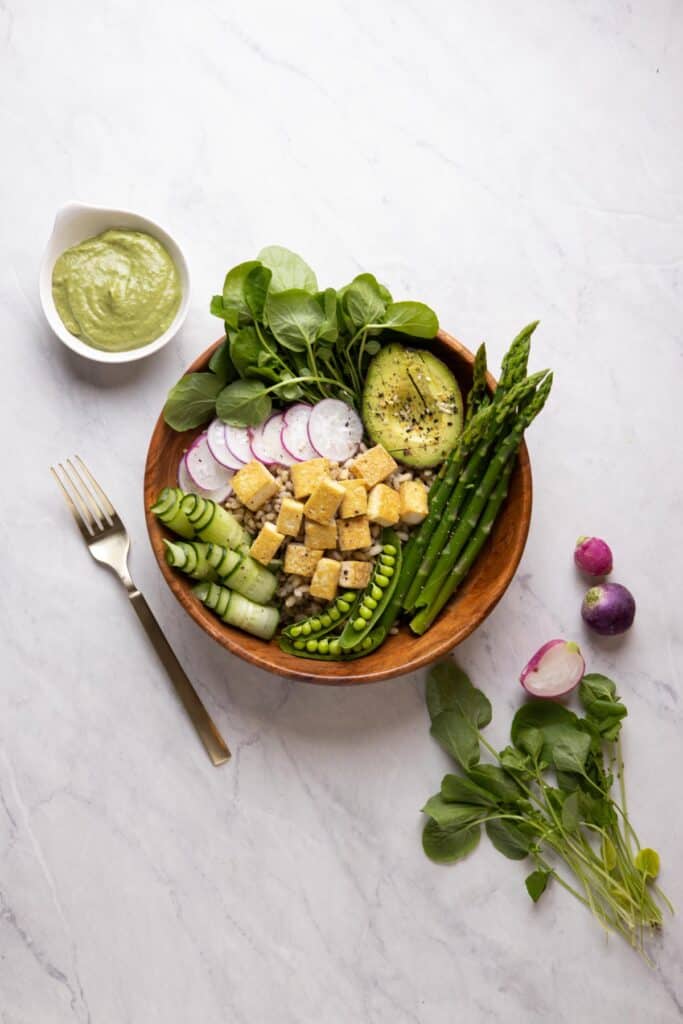
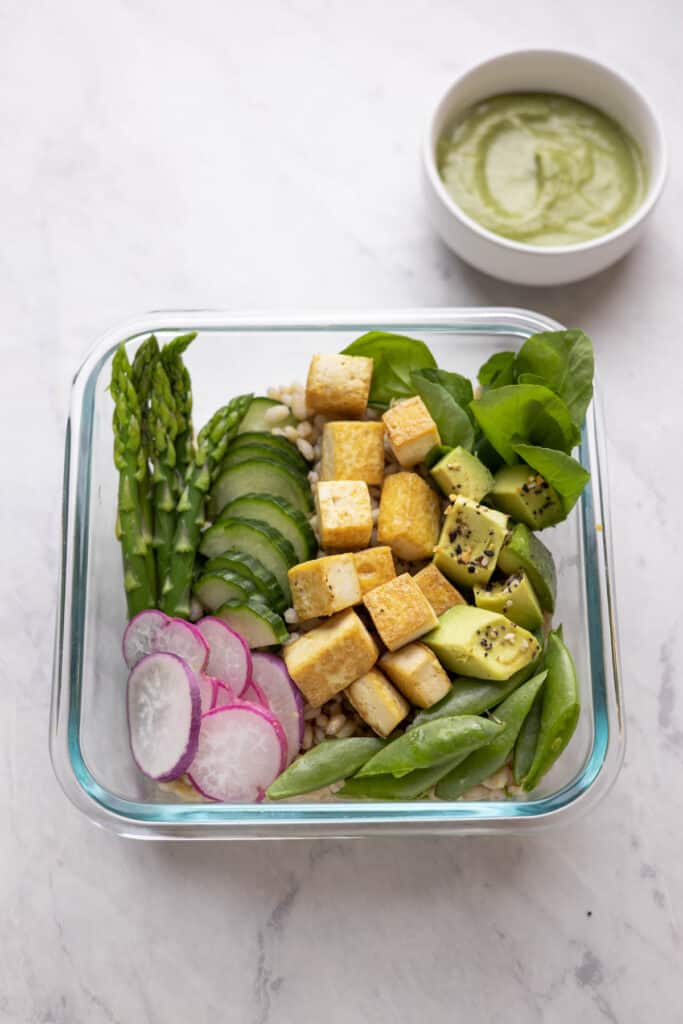
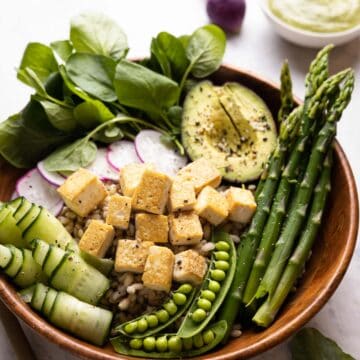
This vegan spring grain bowl celebrates the best of early spring produce like asparagus, radishes, snap peas and watercress. A bed of wholesome barley will keep you feeling full for hours while crispy tofu cubes add protein to this vegan bowl. Pair it with my creamy avocado tahini sauce to make this buddha bowl irresistible!
If you love to nourish your body with fresh seasonal produce while those flavors are at peak perfection, then you’ll absolutely love this healthy grain bowl! Here’s why it’s a winner:
- Vegetarian and vegan thanks to using tofu as the protein source!
- Variety of textures-crunchy peas and radishes, creamy avocado, crispy tofu and nutty barley
- Dairy-free! But I won’t judge you if you add a sprinkling of goat cheese or vegan cheese on top.
- SO green-we all know to eat our greens and this bowl alone will hit all your daily nutritional requirements
- Quick and easy-if you meal prep the tofu, barley and dressing ahead of time then you can whip this up for lunch in less than 5 min!
- Meal prep-friendly-See below for how to meal prep this for a light lunch, or a quick weeknight dinner you can feel good about!
Ingredients & Substitutions
No matter what you call them, buddha bowls, grain bowls, nourish bowls etc, these recipes are always great for being able to customize them based on what’s in your fridge. So while I have a recipe laid out for you, here’s some ideas on how you could switch things up:
- Barley-I love the toothsome texture and nutty flavor of barley but by all means use quinoa, farro, couscous, brown rice or cauliflower rice.
- Asparagus-Come spring, you can find beautiful asparagus for super affordable prices! But if it’s not your thing, give green beans a try instead.
- Tofu-I like to challenge myself to eat at least 1 vegan or vegetarian meal each day and tofu is a great option to add in some protein. But of course, chicken or salmon would also be delicious on top of this fresh bowl. Or just leave it out all together!
- Watercress-I tend to lean on arugula and spinach pretty heavily as my greens of choice, but I thought peppery watercress would be a fun addition to this bowl since it’s in season and gorgeous during the early spring! For a milder flavor, use spinach or butter lettuce.
- Radishes-Like the watercress, radishes can have a pretty strong peppery bite to them. I love the crunch and color they add but you can leave them out all together if they’re not your fave.
- Snap Peas-I love the sweetness of snap peas when they’re in peak season but you can easily swap them out for green beans, English peas, fava beans or even edamame!
How to Cook Barley on the Stovetop
Like any recipe, you want to start with the thing that will take the longest. In this case, it’s the barley. How long barley takes to cook depends on whether it’s “hulled” or “unhulled.” In general, you’ll want to follow the instructions on the package.
However, if you’re like me and prefer to buy your grains in bulk, you may not have a package to guide you on how to cook it. For simplicity sake, we will focus on hulled/pearl barley and unhulled/pot barley.
Since we want a nice, fluffy texture, I’m going to share the “absorption” method of cooking barley for this recipe. You can find the full details in the recipe below.
- Start by rinsing your barley well and draining thoroughly.
- Add 1 cup of barley and 3 cups of stock with a pinch of salt to a sauce pan.
- Bring the water to a boil, watching it closely because it can get very foamy and overflow.
- Once at a boil, reduce the temperature to low so it can simmer softly and cover with a lid.
- Cook until the water has been mostly absorbed and the grains are slightly chewy and not hard, but also not overcooked and mushy.
- Strain cooked barley through a sieve in order to get rid of any excess water that wasn’t fully absorbed.
- Spread on a cookie sheet in order to cool the barley quickly so it doesn’t overcook.
Pearl barley will take about 40-45 minutes to cook al dente while pot barley will take 50-60 minutes to cook.
*If you run out of water during the simmer process, you can add another half cup at a time to keep it from burning on the bottom of the pot.
How to Cook Barley in an Instant Pot
I love using my instant pot as a way to cook things like grains or large cuts of meat in an almost completely hands off way. If you own an instant pot and want to use it to cook your barley, here’s what you’ll need to do.
- Rinse your barley with cold water and drain well.
- Add 1 cup of pearl barley, 2.5 cups of water and a pinch of salt to your instant pot.
- Put the lid on, close the valve and set to pressure cook for 20 minutes.
- Once the barley has pressure cooked for 20 minutes and it beeps at you, carefully turn the valve on top (using a hot pad) to quick release the hot steam.
- Fluff with a fork and spread on a cookie sheet to cool.
Step by Step Instructions
This recipe is quite easy. You’ll start by making your batch of barley. While that’s cooking, you’ll want to prep your tofu. Take it out of the package and drain well. Sandwich the tofu block between two thick layers of paper towels (think 5-6 paper towels) on the top and bottom of the tofu.
Then take a skillet or sheet pan, place it on top of the tofu and weigh it down with a few heavy cans to help squeeze out the water.
Replace the paper towels after 15 minutes because they will be soaked at that point. Squish for another 15 minutes and you will be good to go.
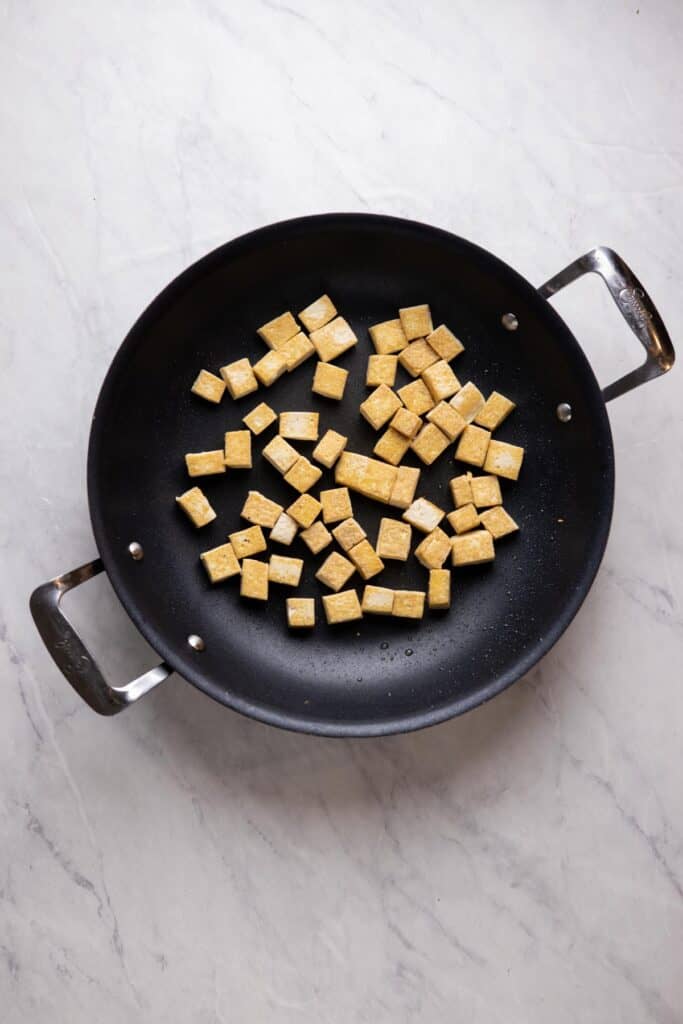
Bring a skillet to medium heat and add 2 tbsp of avocado oil or another high heat oil. Cut your tofu into cubes and add them to the hot pan. Cook until golden brown on a few of the sides.
I find if you try to brown *all* the sides of the tofu, it becomes too tough and dried out. By only browning 2-3 sides they stay pillowy on the inside, yet crunchy on the outside.
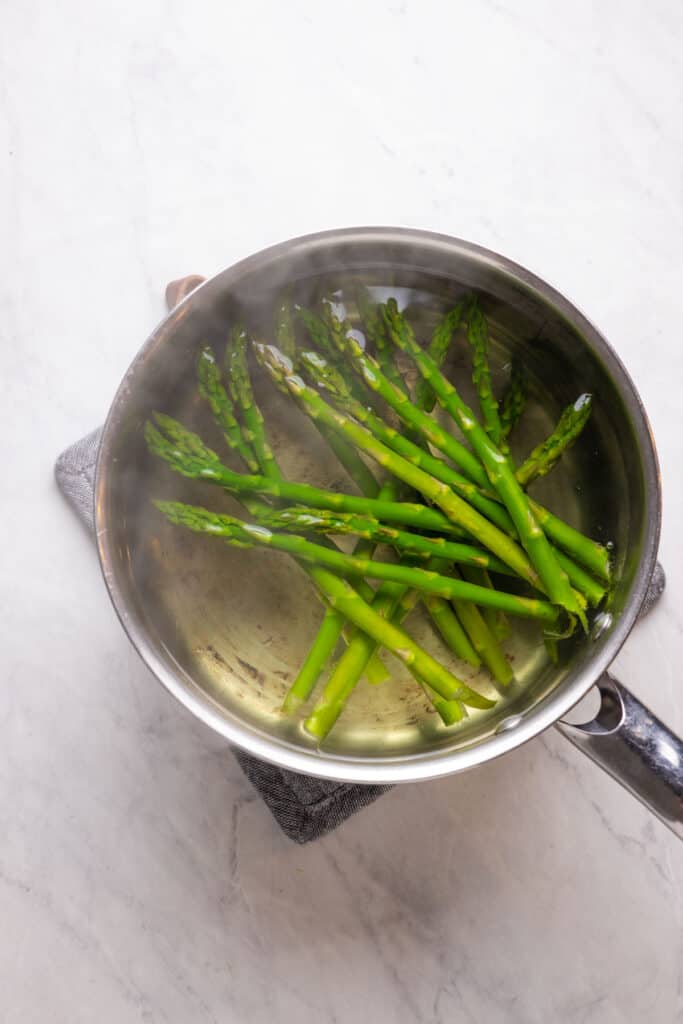
While the tofu is being squeezed dry, you can blanch your asparagus. I love the blanching method for meal prepping because you cook the asparagus until it just barely takes the raw crunch out of the vegetable. This means, you can still toss it in a hot skillet on another night with some garlic and shallot to make a quick side dish without it becoming overcooked and soggy.
You can opt to roast the asparagus in a 400 degree oven with oil, salt and pepper for 8-10 minutes. However if you do that, roasted asparagus won’t keep as long in the fridge and tends to get soggy and limp. *But it’s still delicious*. I lean towards roasting asparagus if I’m going to eat the bowl right then. If I’m prepping ingredients ahead of time, then I will usually blanch instead.
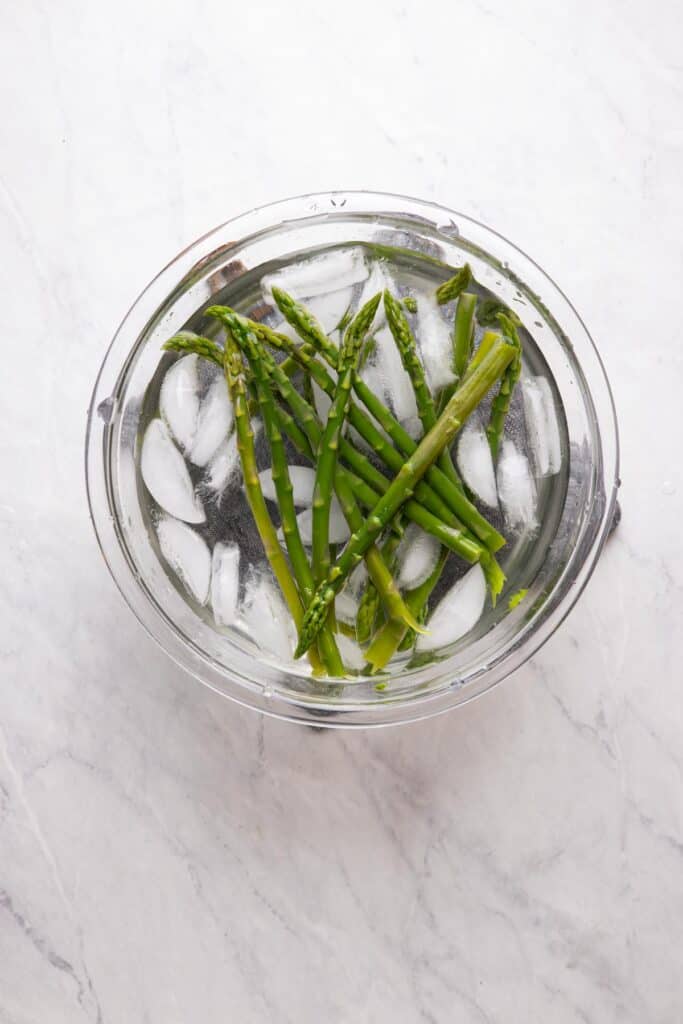
You’ll bring a pot of salted water to a boil and drop your asparagus in. Cook for 3-5 minutes or until just barely tender. Immediately remove the asparagus from the hot water and plunge into an ice bath to cool. Drain well.
Now that the barley, tofu and asparagus are all cooked to perfection, all that’s left is to blitz up the avocado tahini sauce ingredients in a food processor and slice up some fresh cucumber, radish and snap peas.
I like to add a handful of watercress because it love it’s peppery bite and delicate texture. However, if it’s not available or it’s just not your favorite, feel free to substitute with arugula, spinach, kale or spring greens.
Expert Tips
Here’s a few pro tips for cooking these ingredients!
- When cooking barley, or any grain for that matter, it’s best to spread it out on a cookie sheet to cool immediately after cooking. This ensures that bacteria cannot grow if it stays in the “danger zone” too long (40F-140F). It also keeps the grains from clumping together or becoming gummy.
- Store the ingredients separately in order to keep them as fresh as possible. Then, add together in a bowl when you’re ready to eat.
- For the asparagus, look for medium sized spears that are not too thick or pencil thin. Snap the tough and woody ends off with your hands or with a knife.
- Radishes have a strong and peppery bite. Slice as thin as possible so it doesn’t overwhelm the other flavors. Or, try roasting them in the oven to completely take away the spiciness. Roasting brings out their sweet and buttery flavor instead!
Frequently Asked Questions
Is barley gluten free?
No barley is not a gluten free grain.
How do I meal prep this spring vegetable grain bowl?
Start by storing the individually prepped ingredients separately. Assemble in a meal prep container by layering the ingredients. Put the sauce in a separate container and drizzle over the bowl when you’re ready to eat.
How long will each meal prepped ingredient last if made ahead of time?
The tofu will last 4-5 days in the fridge, the barley will last 5 days and the blanched asparagus will last 3 days. If you choose to roast the asparagus, it will only last 2 days before getting soggy.
How to Customize This Bowl
What makes buddha bowls so wonderful is that they are so customizable! The possible flavor combinations you can try are endless. Here are some ideas for other ingredients you can use.
- PROTEIN: tofu, chicken, chickpeas, tempeh, or tuna
- GRAINS: barley, quinoa, couscous, farro, kamut, white or brown rice
- VEGETABLES: peas, carrots, corn, tomato, arugula, green beans, roasted potato, beets
- FUN TOPPINGS: goat cheese, feta, sunflower seeds, sprouts, hemp seeds, sliced almonds, chives or any fresh herbs, everything but the bagel seasoning
- SAUCE: avocado tahini sauce, cilantro jalapeno sauce, green goddesss dressing, zippy lemon basil vinaigrette
More Delicious Grain Bowls to Try
If you’re on the grain bowl train, then here are some other delicious and seasonal bowls recipes you can try!
Summer grain bowl with Lemon Basil Vinaigrette
Peach Salmon Bowl with Lemon Chive Vinaigrette
Strawberry Summer Quinoa Salad with Strawberry Basil Dressing
Vegan Nourish Bowl with Maple Tahini Dressing
Vegan Spring Grain Bowl
Equipment
- food processor or blender
- pressure cooker (optional)
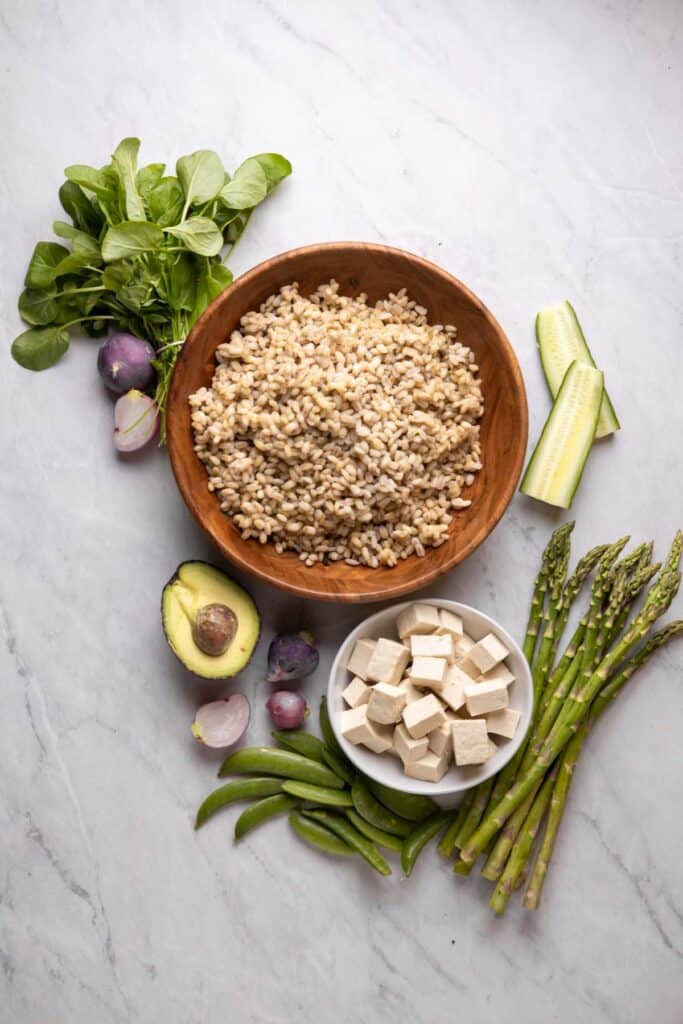
Ingredients
- 1 cup pearl barley
- 1 block extra firm tofu
- 2 tbsp avocado oil
- 1 lb bunch of asparagus
- 1 avocado
- 2 cups sugar snap peas
- 1/2 hothouse cucumber
- 2 radishes
- 1 bunch of watercress greens
Instructions
Barley
- If you're using the stovetop method to cook your barley, rinse and drain your barley thoroughly. Add 1 cup of barley, 3 cups of water or vegetable stock, and a pinch of salt to a sauce pot.
- Bring to a boil and then lower the heat to low so that it comes to a simmer. Cover with a lid and simmer for 40-45 minutes or until the barley is chewy but not mushy. If you notice the water has evaporated from the pan before it's done cooking, add more water 1/2 cup at a time so the barley doesn't burn to the bottom of the pot.
- If you're using the pressure cooker method to cook your barley, rinse and drain your barley thoroughly. Add 1 cup of barley, 2.5 cups of water or vegetable stock, and a pinch of salt to the pressure cooker. Seal and cook on high pressure for 20 minutes. Once the pressure has built and it's cooked for 20 minutes, do a quick pressure release.
- For either the stove top method or pressure cooker method, once done cooking spread the barley onto a cookie sheet in a thin layer until it's cooled.
Grain Bowl
- For the tofu, remove from package and drain well. Sandwich the tofu block between thick layers of paper towels on the top and bottom of the tofu. Weigh the top of the tofu down with a heavy skillet and some cans in order to help squeeze out any excess water.
- Replace the paper towels after 15 minutes with fresh towels and squish for another 15 minutes. Then cut into 1/2" cubes.
- Heat a skillet to medium heat and add 2 tbsp of avocado oil or any high heat oil. Once hot, add your cubed tofu along wtih a pinch of salt and pepper. Turn occassionally, until golden brown on 2-3 sides, then remove from the heat and place cubes on a paper towel to soak up any excess oil.
- For your asparagus, you can either roast in a 400 degree oven for roughly 8 minute, saute in the same pan as the tofu until crisp tender, or my preferred method: blanched.
- To blanch your asparagus, bring a pot of salted water to a boil. Add your asparagus spears to the boiling water for 3-4 minutes (depending on the thickness of your spears). In the meantime, prep a bowl of ice water. Once the asparagus is slightly tender but still has some crunch, remove it from the boiling water and immediately plunge it in the ice bath for 5 minutes to keep it from cooking any further. Then drain well.
- To prep your remaining veggies, slice the radishes as thinly as possible. Slice or dice your cucumber and halve your snap peas if you prefer.
- To assemble your grain bowl, layer with your cooked barley, watercress, blanched asparagus, snap peas, radishes and cucumber and top with crispy cubed tofu. Drizzle with the sauce of your choice but I highly recommend my avocado tahini sauce that you can find linked in the notes below.
Notes
- You can swap out the barley for any grain of your liking such as quinoa, farro, brown rice or couscous to name a few.
- You can also bake your tofu in a 400 degree oven for 20-30 minutes, rotating occasionally, and roast the asparagus on the same pan for the remaining 8-10 minutes of cook time to cut down on doing dishes!
- I highly recommend a healthy drizzle of this avocado tahini sauce on top!

I love this dish for meal prep! We are gf so we swap quinoa for the barley and still tastes so fresh!
Yes! I love switching it up with quinoa as well. So glad you like it!