• Skip to primary navigation
  • Skip to main content
  • Skip to primary sidebar
  • Recipes
    • Breakfast
    • Drinks
    • Lunch
    • Dinner
    • Salads and Sides
    • Sauces & Dips
    • Vegetarian
    • Dessert
  • About Me
  • Batch Cooking For Beginners
  • Weekly Batch Cooking

Fancy Without the Fuss logo

July 4, 2020

Lemon Beet Hummus

Share
Pin34
34 Shares
Jump to Recipe Print Recipe

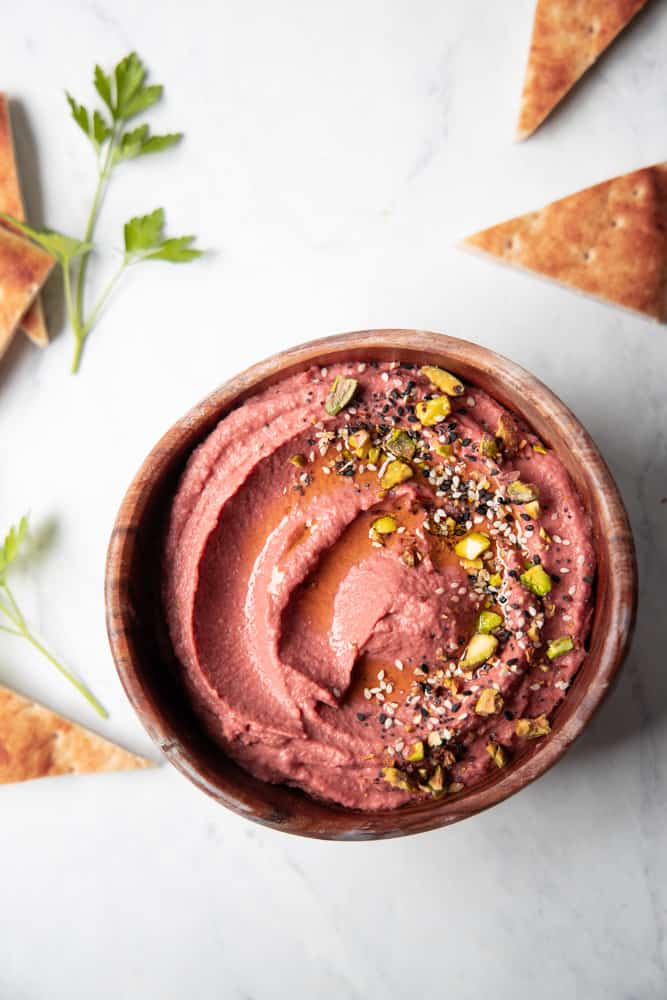
This lemon beet hummus is a favorite in our house because it is so vibrant and colorful with a zippy lemon flavor and impossibly creamy texture. Even the self proclaimed beet haters love it!

lemon beet hummus in a bowl with garnishes on top
Contents hide
1 WHY YOU'LL LOVE THIS RECIPE
2 HOW TO MAKE THIS RECIPE IN 5 MINUTES
3 HOW TO MAKE THE SMOOTHEST HUMMUS
4 MEAL PREPPING THIS LEMON BEET HUMMUS
5 IDEAS FOR RECIPES THAT USE BEET DIP
6 INGREDIENTS AND SUBSTITUTIONS
7 Lemon Beet Hummus
7.1 Equipment
7.2 Ingredients 1x2x3x
7.3 Instructions
7.4 Notes

WHY YOU'LL LOVE THIS RECIPE

This lemon beet hummus checks a ton of boxes for fitting into a variety of different diet and allergy categories making it perfect to take to potlucks where you won't know everyone's food preferences. Best of all, you can meal prep it and it will last all week (unless you devour it first!)

  • Dairy Free
  • Gluten Free
  • Vegan and Vegetarian
  • You can sneak the beets in to get your kids to eat their vegetables without even knowing it
  • Gorgeous fuchsia pink color
  • Perfect for meal prepping ahead of time!
  • Great for potlucks and gatherings
  • Keeps for a week in the fridge
  • Delicious as a dip, in wraps or smeared onto a bun for veggie burgers
Contents hide
1 WHY YOU'LL LOVE THIS RECIPE
2 HOW TO MAKE THIS RECIPE IN 5 MINUTES
3 HOW TO MAKE THE SMOOTHEST HUMMUS
4 MEAL PREPPING THIS LEMON BEET HUMMUS
5 IDEAS FOR RECIPES THAT USE BEET DIP
6 INGREDIENTS AND SUBSTITUTIONS
7 Lemon Beet Hummus
7.1 Equipment
7.2 Ingredients 1x2x3x
7.3 Instructions
7.4 Notes

HOW TO MAKE THIS RECIPE IN 5 MINUTES

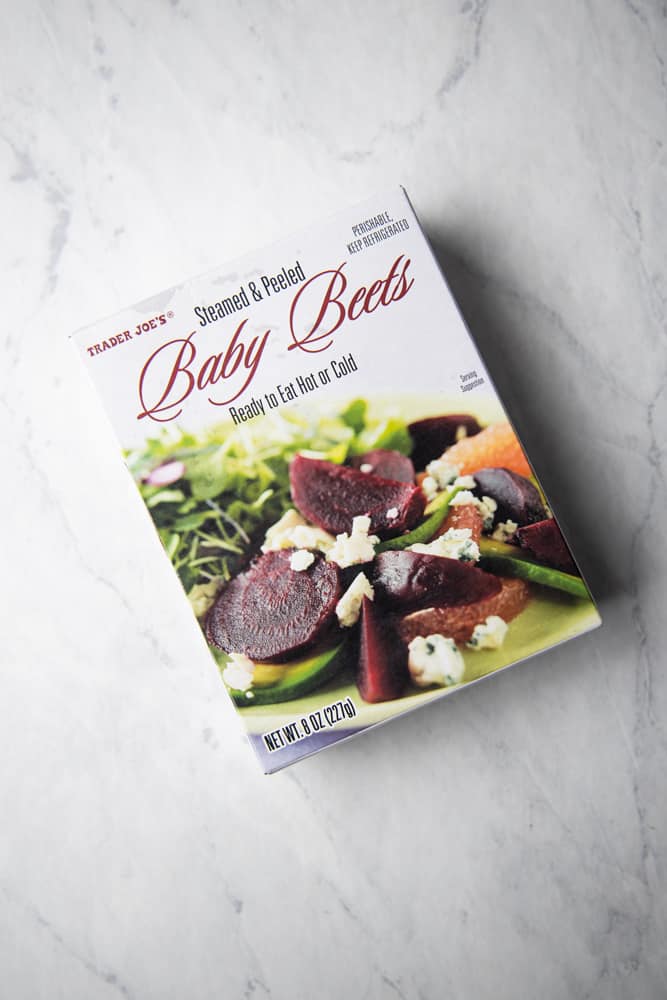
I love a good dip that I can whip together in 5 minutes or less. Sometimes, that means taking advantage of a few shortcuts. In this case, I utilize beets that are already steamed and peeled. Could you do this yourself? Of course! Does it take forever and leave your kitchen looking like a crime scene? Yup! It's well worth it in my opinion and Trader Joe's has a great option that's still affordable.

NOTE: To get the brightest and most vibrant pink color, you'll want to cook the beets fresh yourself.

package of steamed and peeled baby beets

HOW TO MAKE THE SMOOTHEST HUMMUS

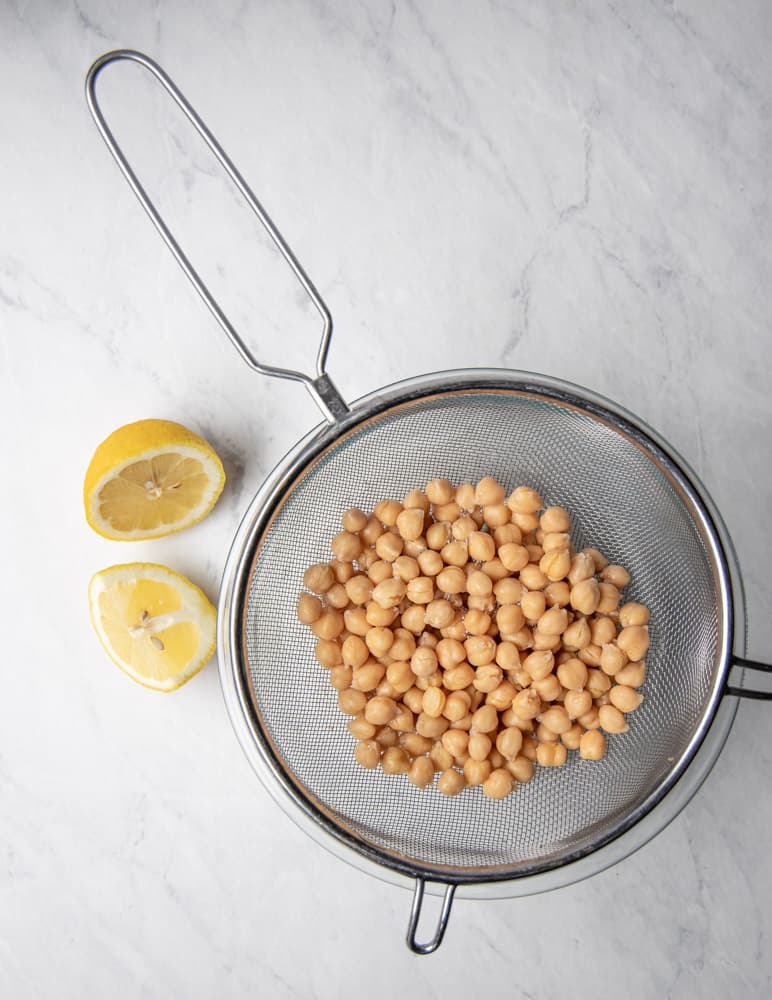
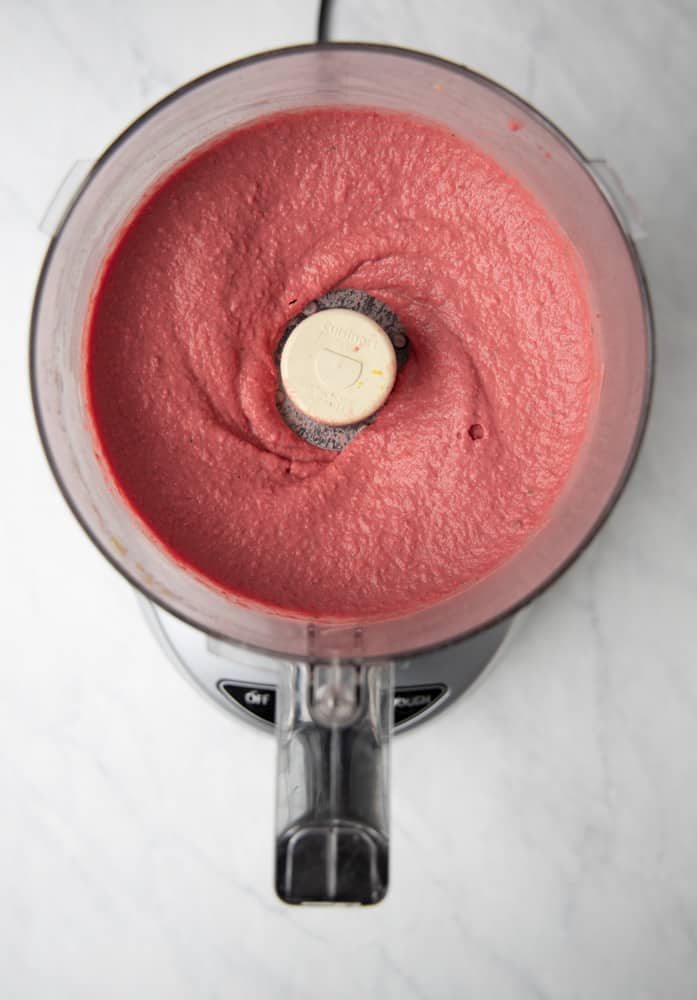
One key to making impossibly smooth pink hummus is to try and remove as many garbanzo bean skins as possible. It's time consuming but worth spending an extra minute to do so! After I rinse and drain the garbanzo beans in a strainer, I'll rub my hand over the top to loosen up their skins. Then it's just a matter of picking them out. You don't have to obsess over it, but you will notice a big difference in the texture if the end result.

If you really want to go the extra mile, you can soak and cook the garbanzo beans yourself, for the ultimate in flavor and texture. But then, it's not really a quick and easy 5 minute beet dip anymore.

garbanzo beans in a colander

Other than that, it's just a matter of letting the food processor do the work for you! You can also use a blender, but depending on how powerful it is, you may need to add a little water to get it to blend thoroughly.

For extra flavor, I add not only the juice of a lemon, but also the zest. A little fresh parsley adds an herbaceous touch, raw garlic brings some spicy zing, cumin adds an undertone of smokiness, and tahini lends a nutty flavor and smooth texture that can't be "beet".

ingredients for lemon beet hummus in a food processor

MEAL PREPPING THIS LEMON BEET HUMMUS

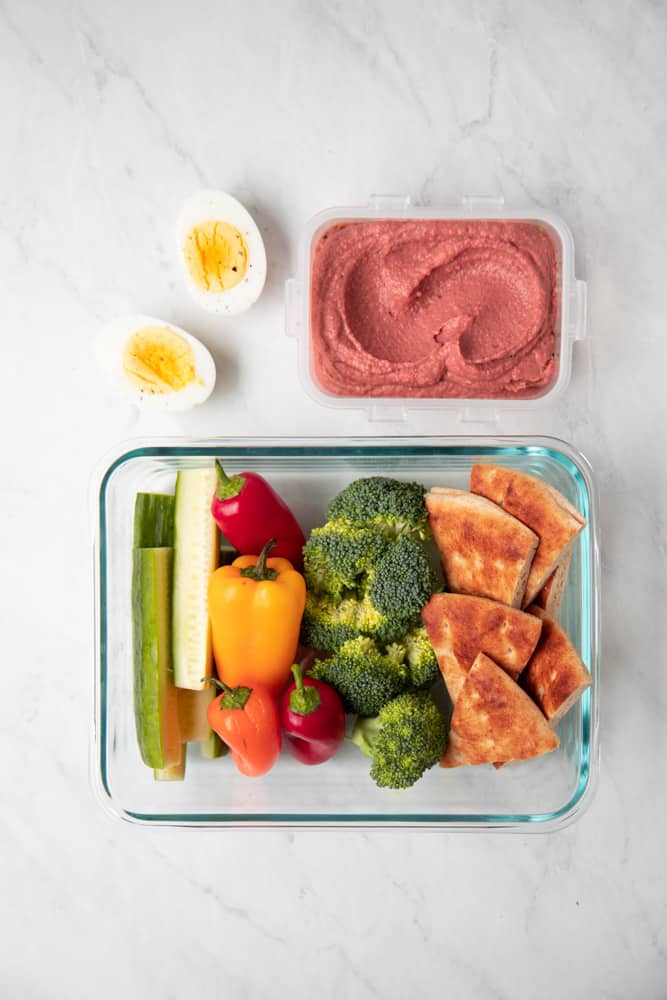
How often do you find yourself rushing around during your day, without a plan for food, and thinking to yourself "What I wouldn't give for a healthy drive through option right now!" I know I'm not the only one. My go-to is Starbucks since they have those little snack packs with things like hummus, chicken and veggies, or hardboiled eggs, crackers and apple slices. Those suckers get expensive though!

I decided I could easily make my own version. Not only does it save me TONS of money, but this way I could customize with the veggies that my family loves. And what do you know, what I had prepped this week was gobbled up in 24 hours!

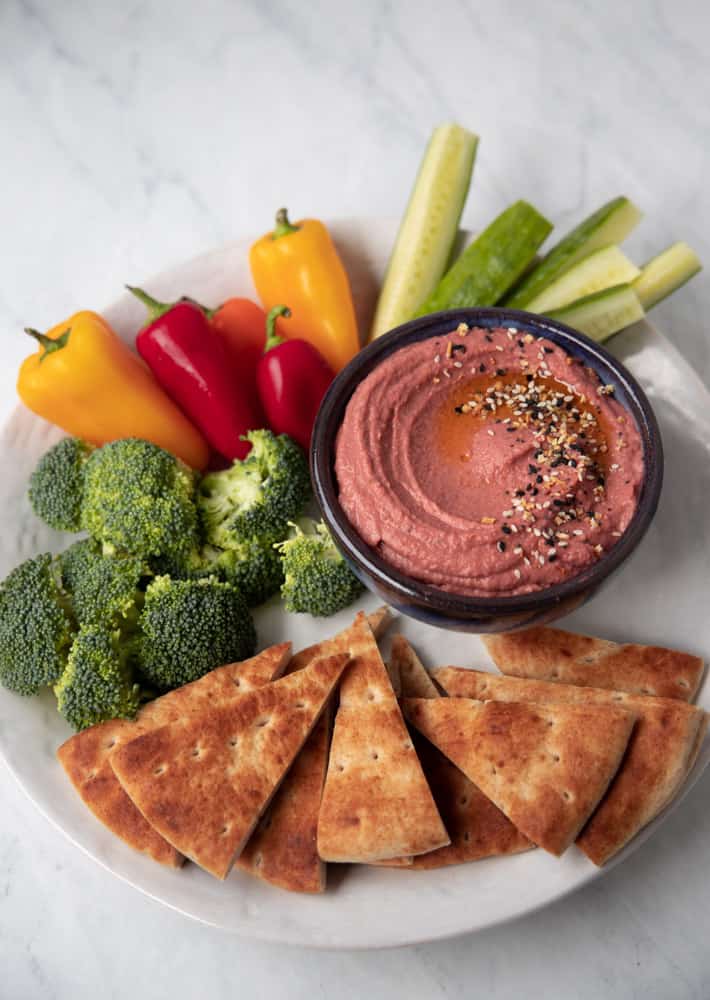
It's amazing how much of a difference it makes when you have fresh veggies available at your fingertips. For my family, the trick to eating healthy really is just putting those prepped fruit and veggies at the forefront so we don't default to grabbing chips or something processed. If I put a platter of this lemon beet hummus out on the counter with a variety of dippers, it'll be gone in half an hour!

Tupperware with sliced veggies and pita bread with lemon beet hummus on the side

IDEAS FOR RECIPES THAT USE BEET DIP

You don't have to be a meal prepping fanatic like me to get the most out of this hummus. Here are some of my favorite ways to enjoy it:

  • As a spread inside of a tortilla wrap filled with romaine, shredded carrots, chicken, cucumber and sprouts
  • As a spread on your veggie burger bun
  • Inside a pita pocked stuffed with falafel
  • Thinned out with water and drizzled on top of a buddha bowl
platter of fresh cut veggies and a bowl of beet hummus

INGREDIENTS AND SUBSTITUTIONS

  • BEETS-I buy pre-steamed and peeled packaged beets that are vacuum packed. These are NOT the same as the kind in the can which have a metallic taste and can have a mushy texture. Avoid pickled beets too, those are not interchangeable! One substitution I have found is using ground beet powder that I find at the health food store. The color is pure magic and it doesn't have as strong of an earthy beet flavor. Much less messy too!
  • TAHINI-Tahini is made from ground sesame seeds and is a one of a kind flavor. I wouldn't substitute with a nut butter as those flavors would overwhelm the hummus. If you don't have it or can't find it, you can just omit.
  • LEMON-I use the zest AND the juice because it adds even more lemon flavor and tang to offset the creamy hummus.
  • PARSLEY-If you don't have parsley, I would substitute another delicate herb such as dill or chives but you can also just leave it out. It just adds a hint of herb flavor.
  • CUMIN-A little goes a long way so I only add a little in this recipe. It's slightly bittersweet with undertones of earthy and nuttiness. If you don't have it on hand you can omit.
  • GARLIC-I add two cloves and it adds a noticeable spiciness to the recipe. If you don't want to actually taste the garlic, or have garlic breath after, I'd recommend scaling back to one clove or substituting a little garlic powder instead.
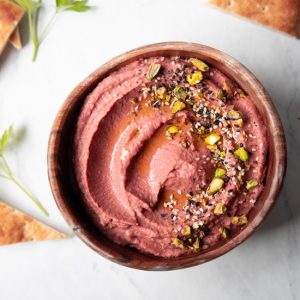
  • GARNISH-I top it off with a glug of extra virgin olive oil, Trader Joe's Everything But the Bagel Seasoning and some crushed pistachios. Other favorites are hemp hearts, chia seeds, puffed quinoa, pine nuts, and sesame seeds.
food processor with blended pink hummus

Lemon Beet Hummus

This lemo beet hummus is a show stopper with its vibrant pink color! Lemon and garlic mellow out the earthy beets to give it a complex flavor while tahini and chickpeas make this dip impossibly smooth. It's a must to have on hand for healthy snacking!
5 from 2 votes
Print Recipe Pin Recipe
Prep Time 5 mins
Course Sauce
Servings 2 cups

Equipment

  • food processor

Ingredients
  

  • 8 oz steamed and peeled beets
  • 1 12oz can garbanzo beans
  • ¼ cup tahini
  • 1 whole large lemon, zested and juiced
  • 2 cloves garlic, peeled
  • 2 tablespoon fresh parsley
  • ½ teaspoon ground cumin
  • 1 teaspoon kosher salt
  • ¼ cup extra virgin olive oil

Instructions
 

  • In a colander, rinse and drain the garbanzo beans thoroughly. Rub your hands over them to loosen up their skins and remove as many as possible for a smooth texture.
  • In a food processor, add the beets, rinsed garbanzo beans, tahini, lemon zest and juice, parsley, garlic, cumin, and salt. Pulse until combined.
  • With the motor running, slowly drizzle in the olive oil until very smooth and uniform in color, about 1 minute.

Notes

-Using pre-steamed and peeled beets will save you so much time!  Just look for the fresh vacuum sealed kind that are refrigerated in the produce section and not the kind in a can.
-If you don't have a food processor, you can also use a blender but you may need to add a little water to get it to blend properly.
Keyword hummus, chickpeas, vegan, vegetarian, dip, snack
Tried this recipe?Let us know how it was!
Share
Pin34
34 Shares

Filed Under: Sauces & Dips, Snacks

Reader Interactions

Comments

  1. Chloe says

    July 04, 2020 at 11:28 pm

    This looks fabulous! A great twist on a classic!

    Log in to Reply
    • Katie Clack says

      July 04, 2020 at 11:46 pm

      Thanks Chloe I hope you give it a try sometime!

      Log in to Reply
  2. Mariana says

    July 05, 2020 at 6:52 am

    5 stars
    Such a perfect hummus recipe! Looks delicious and I love the idea of doing it as meal prep 😊 loving all your recipes!

    Log in to Reply
    • Katie Clack says

      July 05, 2020 at 6:11 pm

      You’re the best Mariana!

      Log in to Reply
  3. Victoria says

    July 06, 2020 at 8:24 pm

    Can’t wait to make this! Looks absolutely delicious 😋

    Log in to Reply
    • Katie Clack says

      July 06, 2020 at 9:44 pm

      Thanks Victoria! Let me know if you try it!

      Log in to Reply

Leave a Reply Cancel reply

You must be logged in to post a comment.

Primary Sidebar

Katie Clack

fancywithoutthefuss

It looks fancy, but it’s secretly the easiest br It looks fancy, but it’s secretly the easiest brunch ever 😏. Just let the blender do all the work for you! 
This Dutch Baby pancake makes magic in the oven and puffs up like a dream—just top with fresh berries and some edible flowers for major wow factor 🍽️✨

Sign up for my weekly newsletter and you’ll get a free download of my summer cookbook where you can find this full Dutch baby recipe!
#FancyWithoutTheFuss #Effortlessentertaining #DutchBaby #Brunchgoals #brunchrecipe #castironcooking #breakfastrecipes #prettyfoodtastesbetter
Since you can never have enough summer salad recip Since you can never have enough summer salad recipes in your back pocket, here’s one more for ya! 🥗My kale Caesar with addictive everything bagel croutons and flakey everything but the bagel salmon. 😮‍💨. I could honestly eat this every day! That kale makes it so hearty and store-bought Caesar dressing is your best friend for weeknight ease.  Give it a go tonight! 

#salmonrecipe #salmonrecipes #ebtb #bagelporn #summersalad #summersalads #summerrecipe #healthyrecipes #healthyrecipeideas #seafoodrecipes #weeknightdinner #weeknightmeals #weeknightcooking #saladsofinstagram #healthysalads 

1/2 lb salmon filets, bones removed
6 cups shredded kale
1 everything bagel, cubed
1 avocado, sliced
1 tbsp everything but the bagel seasoning, divided
1/3 cup caesar dressing
2 tbsp olive oil
1/3 cup shaved or shredded parmesan
1 tsp olive oil
INSTRUCTIONS
 
•Preheat oven to 400 degrees F
•Toss cubed everything bagel with 2tbsp olive oil and 2 tsp of everything but the bagel seasoning. Spread onto a sheet pan and bake for 10-12 minutes, rotating the pan and giving it a little shake halfway through.
•Bake until golden crown and crunchy throughout with no softness in the center of the cubes.
•Spread a teaspoon of olive oil onto the salmon filet. Sprinkle the remaining 1 tsp of everything but the bagel seasoning over the top of the salmon. 
•Bake at 400 degrees for 8-10 minutes or until cooked to your liking.
Depending on the thickness of your filet, 8 minutes should cook through to medium rare. To be cooked well done, it will take closer to 10-12 minutes.
•While the salmon and the croutons cook, put the shredded kale into a bowl. Drizzle over the caesar dressing and massage it into the kale using your hands.
Massage well for 1 minute and then left the kale rest for 5-10 minutes while the items in the oven finish cooking.
Assemble salad by dividing kale into two bowls. Place a salmon filet on the top of each and scatter around croutons. Shave or grate parmesan over the top. Place sliced avocado around and serve with a fresh lemon wedge.
THE big batch drink of the summer for all your bbq THE big batch drink of the summer for all your bbq, bridal shower, birthday party or beach picnic gatherings!  It is so incredibly refreshing and light but has a tendency to sneak up on you so pace yourself and make sure you enjoy it with a heaping plate of food! 🥂

Blend together 1 1/2 cups halved fresh strawberries and 1/4 cup Fresca until smooth.  In a pitcher, add your strawberry puree, 1 bottle of rose, 1/2 cup vodka, 1/2 cup sliced strawberries, 1/2 cup fresh raspberries, 1 sliced lemon, the juice of 1 lemon, and 1 cup fresca.  Stir together.  Add ice to your glass and fill with sangria, leaving room at the top for a little floater of fresca or soda water to serve.  Garnish with edible flowers such as chamomile, violas or pansies. 
#sangria #sangría #sangria🍷 #rosé #batchcocktail #boozy #summerdrink #summerdrinks #summercocktails #summercocktail #cocktailrecipes #cocktailrecipe #summerrecipes #cocktaillovers
These jalapeño corn fritters are my son’s favor These jalapeño corn fritters are my son’s favorite dish I make and they will be yours too! They are the perfect side dish for salmon, chicken, steak, you name it! 🌽. Sweet corn packed with fresh herbs, cheddar and hint of heat.  Did I mention how easy they are?! There’s nothing better! 🤌🏻

Jalapeno Corn Fritters

3 ears of corn kernels (~2 cups)
1 shallot, minced (~1/4 cup)
1/2 jalapeno, seeded and minced
2 cloves garlic, minced
2 green onions, sliced
1/4 cup chopped cilantro
1/2 tsp kosher salt
1/2 cup grated white cheddar
1/2 cup all purpose flour
2 eggs

Mix everything together in a mixing bowl until flour and eggs are incorporated.  If you have time, let the mix chill in the fridge for 10-15 minutes.  Over medium high heat, add 2-3 Tbsp of avocado oil to a pan.  Using a 1/3 measuring cup, scoop out corn fritter batter into pan and smash into a flat disc.  Pan fry until golden brown on both sides.

#cornrecipes #itscorn #summerrecipes #summerrecipe #sidedish #sidedishes #sidedishrecipes #easyrecipe #vegetarianrecipes #vegetarianfood #summerfood #summerfoods #bbq #jalapeno #fritters #fritter
Need to bring an appetizer to your next summer par Need to bring an appetizer to your next summer party? I’ve got you covered with this everything bagel, smoked salmon dip!  The food processor does all the work for you, so you don’t need to turn on the oven on those hot summer days.  Serve with cucumber slices for your gluten free friends ❤️

Everything Bagel Smoked Salmon Dip
8oz flaky smoked salmon
8oz block cream cheese, softened
1 lemon zested and juiced
1/2 tsp garlic powder
2 tbsp sour cream
3 tbsp minced shallot
2 tbsp minced fresh dill
1 tbsp minced fresh chives
2 tsp everything but the bagel seasoning
1 tbsp capers 

In a food processor, combine smoked salmon, cream cheese, sour cream, lemon zest and juice and garlic powder.  Pulse until creamy but with small chunks of salmon.  Should not be a mousse texture.  Scrape into a bowl and stir in shallot, dill, chives, ebtb seasoning, and capers.  Taste for seasoning and add salt if needed. 

#summerrecipes #bbqrecipes #appetizer #appetizerrecipe #easyappetizer #smokedsalmon #picnic #girldinner #gfrecipes #glutenfree #diprecipe #dip #fancywithoutthefuss
This earl grey crème brulee is a delicious twist This earl grey crème brulee is a delicious twist on a classic and it’s my go to make ahead dessert for almost all my personal chef gigs. It may sound intimidating, but I promise it’s actually really simple! Best of all, you only need a few ingredients!

Earl Grey Creme Brulee
2 3/4 cups heavy cream
1 tbsp vanilla bean paste
6 bags earl grey tea
4 egg yolks
1 wholk egg
2/3 cup white sugar
extra white sugar for the topping

Preheat your oven to 325.  In a medium saucepot, add your heavy cream and vanilla bean paste.  Heat over medium low heat until you see bubbles starting to form around the edge of the cream, but not a simmer.  Add your tea bags and remove the saucepot from the heat, stirring so that a skin doesn’t form on the cream.  Let sit for 10 minutes.  Using the back of a spoon, extract as much of the earl grey tea from the bags as possible and stir.  P

In a mixing bowl combine your sugar, egg yolks and whole egg.  Beat using high speed until the mixture turns a pale yellow color, 30-60 seconds.  Then start slowly adding in the cream mixture to the sugar, 1/2 cup at a time, so that you slowly temper the mix without curdling the eggs.  Once you have about half of the cream mix remaining, you can add it to the eggs all at once. 

Place your ramekins in a baking dish.  Fill your ramekins with the cream and egg mix almost to the top of the ramekins.  Place your baking dish in the oven.  Pour super hot water into the baking dish until it’s halfway up the sides of your ramekins.  Take care not to move the baking dish so that the water doesn’t slosh over into your ramekins.  Bake for 25-30 minutes (depends on the height of your ramekins) or until the center has a slight jiggle to it still.  This will firm up as it cools. 
Let your ramekins cool in the baking dish for 10 minutes and then transfer to a rack to fully cool. Cover with plastic wrap and chill in the refrigerator for 3-4 hours before serving. 
Sprinkle the top with an even, thin layer of white sugar and use a kitchen torch to caramelize the sugar, keeping the flame moving so it doesn’t burn. #dessert #cremebrulee #sweettooth #baking #earlgrey #easydessert #personalchef #dessertporn
This is one of my go-to dishes to bring to any pot This is one of my go-to dishes to bring to any potluck so with graduations and end of the school year parties happening, I’ve been making this pasta salad with arugula pistashio pesto and burrata on repeat. 

I promise if you make this, it will get absolutely devoured.  This homemade pesto is so easy and packs tons of flavor and adding burrata is always a good idea!

Arugula Pistachio Pesto Pasta Salad
8 cups cooked pasta like rotini
1 cup cherry tomatoes, halved
2-3 balls of burrata torn into pieces
2 cups packed arugula
1 cup roasted pistachios 
2 cloves garlic, minced
1 Tbsp lemon zest
1/4 cup lemon juice (~2 lemons)
1/2 cup grated parmesan
pinch red pepper flakes
1/2 tsp flaky sea salt or 1/4 tsp kosher salt
1 cup spinach (if it’s too brown looking)
6T extra virgin olive oil

Arugula Pistachio Pesto Pasta Salad
8 cups cooked pasta like rotini
1 cup cherry tomatoes, halved
2-3 balls of burrata torn into pieces
2 cups packed arugula
1 cup roasted pistachios 
2 cloves garlic, minced
1 Tbsp lemon zest
1/4 cup lemon juice (~2 lemons)
1/2 cup grated parmesan
pinch red pepper flakes
1/2 tsp flaky sea salt or 1/4 tsp kosher salt
1 cup spinach
6T extra virgin olive oil

Combine the arugula, pustachios, garlic, lemon zest, lemon juice, parm, red peoper flakes, and salt in a food processor and pulse a few times to combine.  Drizzle in the olive oil with the motor running.  If it looks a little brown from the pistachios you can add a cup of spinach and blend until smooth-ish.  Toss with your cooked pasta and cherry tomatoes. Top with torn burrata and extra arugula. Drizzle with evoo and top with cracked black pepper and flaky salt.

#pastasalad #potluck #summersalad #pesto #arugula #pistachio #pestopasta #pastaporn #burrata #summerdinner #entertaining #bbqdish #sidedishrecipe #sidedish
No dinner plans? No problem! Lean on some pantry s No dinner plans? No problem! Lean on some pantry staples and whip up these easy tuna fritters with lemon dill sauce for a flavorful and filling weeknight dinner! 

Tuna Fritters
1 can tuna, drained well
1 tbsp finely chopped celery
1 tbsp finely chopped shallot
1 tbsp fresh chives, minced
2 tsp fresh dill, minced
1 egg
1/4 cup grated parmesan
1 tbsp mayo
1 tsp lemon zest
1 tsp fresh lemon juice
2-3 tbsp panko
1/4 tsp garlic powder
pinch red pepper flakes
big pinch sea salt

Mix all the ingredients together in a big bowl.  Ideally chill in the fridge for 30 minutes if you have time.  If the mix is too wet, add another tablespoon of panko until you can form a patty that will keep it’s shape.  Heat a non stick skillet over medium high heat and add 2 tbsp avocado oil.  Fry each side of the patties for 4-5 minutes or until golden brown.  Makes 4 patties, serves 2.

#tuna #weeknightdinner #pescatarian #easydinner #easyrecipes #healthyrecipes #fritter #whatsfordinnertonight #itswhatsfordinner #dinnertonight #tunafish
Load More... Follow on Instagram

Don't Miss These!

Romesco Sauce Without Nuts

Blood orange yogurt loaf on a wooden serving tray.

Blood Orange Yogurt Loaf

bowl full of quinoa, roasted squash, and Brussel sprouts topped with pomegranate seeds and maple tahini dressing

Vegan Nourish Bowl with Maple Tahini Dressing

glass bowls with individual ingredients

Weekly Batch Cooking for April

Categories

  • Appetizers
  • Breakfast
  • Dessert
  • Dinner
  • Drinks
  • Lunch
  • Salads and Sides
  • Sauces & Dips
  • Snacks
  • Vegetarian
  • Weekly Batch Cooking

Recent Posts

  • Furikake Salmon
  • Tropical Overnight Oats with Frozen Fruit
  • Sun Dried Tomato Pasta Chicken
  • Smoked Salmon Frittata
  • Blood Orange Yogurt Loaf

Most Popular Recipes

Glass cup filled with tropical overnight oats.

Tropical Overnight Oats with Frozen Fruit

mason jar glass filled with beet smoothie

Raspberry Coconut Beet Smoothie

Footer

↑ back to top

About

  • Privacy Policy
  • Disclaimer
  • Terms & Conditions
  • Accessibility Policy

Newsletter

  • Sign Up! for emails and updates

Contact

  • Contact

Copyright © 2020 Brunch Pro on the Brunch Pro Theme